Mooshoo’s DIYs that will liven up your Thanksgiving
November 16, 2018
Thanksgiving is a time where I get to be with the people I’m grateful for while simultaneously eating until I feel like throwing up. Whether you’re going to a friendsgiving or spending the weekend at your Aunt Karen’s house, these DIYs will spice up your Thanksgiving.
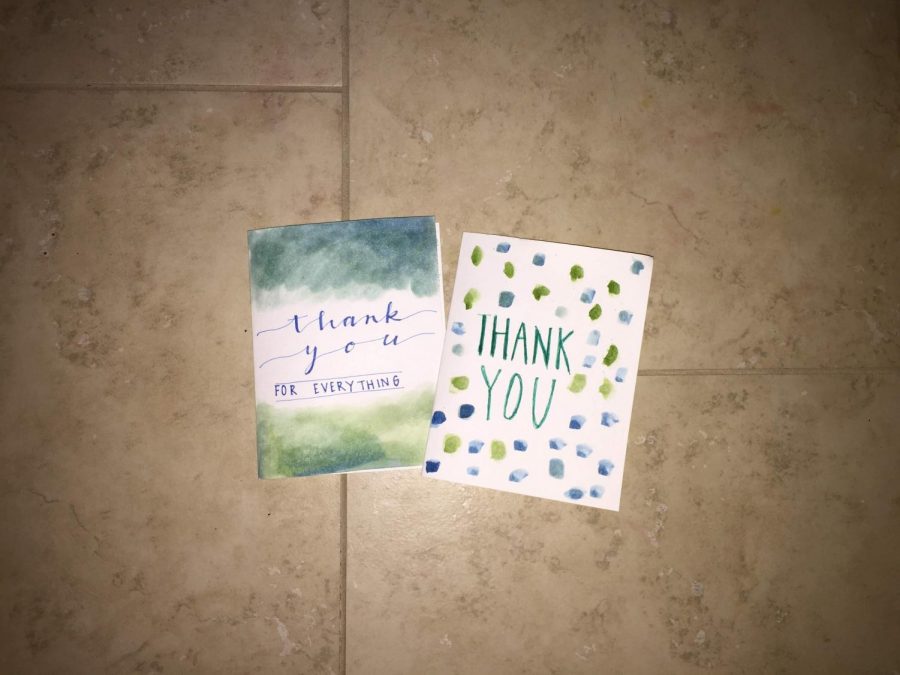
Thank you cards
Thanksgiving is all about taking time to thank the ones that mean the most to you. Making thank you cards has always been something I’ve enjoyed. The fact that I can decorate a card myself and add my own personal touch makes it all the more meaningful. This craft takes around five minutes to do and can mean the world to whoever you’re sending it to.
Materials needed:
- Cardstock paper
- Ruler (optional)
- Scissors (optional)
- Pencil
- Markers
- Watercolor paint
Card
- This step is optional. I felt the cardstock I was using was too big (11 inches by 8.5 inches), so I cut it in half. Before cutting the paper, I recommend using your ruler to measure 5.5 inches in the length, then marking your measurements.
- Take your cardstock and fold it in half to make the blank card.
Decoration
- I used watercolor paints and markers to decorate my cards with an ombre effect. You can decorate your card so it fits to whoever you’re sending it to. For example, I used blue and green because they’re my recipient’s favorite colors.
Floating leaves
This DIY will elevate your house decor to a whole other level and have your guests doing double-takes. It brings a little bit of autumn indoors. Not only does it look cool, but it’s easy to make.
Materials needed:
- Embroidery hoop
- Fishing wire
- Ruler
- Scissors
- Hot glue gun
- Glue sticks
- Fake Leaves
- Fake Flowers
Hoop
- Cut two pieces of wire with your scissors — each piece should be two inches longer than the diameter of the hoop to give some slack for the next step.
- Tie the pieces of wire onto the hoop, placing them so they cross like a plus sign.
- Use a drop of hot glue where the wires cross. That will help you hang the hoop easier.
Floating leaves
- Using the scissors, cut out 3-5 pieces of fishing wire that are about 4 feet each.
- Tie one end of the wire to the hoop, cutting any excess sticking out. Do this with each piece of wire.
- Use hot glue to carefully attach the leaves and flowers onto different sections of the wires. Each wire should have 4-9 total flowers/leaves. I suggest hanging the hoop up while doing this to see what it will look like when done.
- Once you’re satisfied with how your hoop looks, cut off any excess wire hanging off the bottom.
Friendship bracelets
These bracelets are perfect for gift giving! A single bracelet takes less than ten minutes to make and they’re more meaningful than a store bought gift. You can even combine it with a thank you note and make a little package to show your thanks.
Materials needed:
- Alphabet beads
- Colorful beads
- Elastic cord
- Scissors
Bracelet
- Wrap the elastic cord around your wrist and cut where the two ends meet. This will set the length of your bracelet.
- Using the alphabet beads, you can spell out your friend’s name or maybe even a little inside joke between you and them.
- Add colorful beads around the word you strung together. I suggest using two or three of the same color beads in a pattern.
- Once the cord is filled with beads, tie the ends together, forming the bracelet.
Family name sign
This craft radiates “family”: you could hang it on your front door or send it to another family member. Since it’s handmade, there will be more meaning to it. You could even add a personal message on the back. Either way, having your family’s name hung up shows family pride and would be a great piece of decor for this season.
Materials needed:
- Wood slice
- Black and white acrylic paint
- Paint brushes
- Power drill
- Twine
- Scissors
Sign
- Using your power drill, drill holes on the top left and right side of the wood slice. This will be helpful when it comes to hanging the sign later on.
- Use black acrylic paint to paint one side of the wood slice.
- Use white acrylic paint to letter your family’s name on the wood by writing it out in cursive. Anytime you use a downward stroke, make sure to make the line thicker.
- Cut some twine with scissors. It should be four inches longer than the space between the holes.
- Thread the twine from the front of the sign through one of the holes.
- Knot the thread behind the sign multiple times to ensure that the twine will not slip through the hole.
- Repeat this step with the opposite hole.
- Congratulations, your sign is ready to hang!